%20-%20https://sketch.com%20--%3E%3Ctitle%3EBranding%20/%20Automate%20Logo%3C/title%3E%3Cdesc%3ECreated%20with%20Sketch.%3C/desc%3E%3Cg%20id=%22Branding-/-Automate-Logo%22%20stroke=%22none%22%20stroke-width=%221%22%20fill=%22none%22%20fill-rule=%22evenodd%22%3E%3Cg%20id=%22Logo%22%20transform=%22translate(-1.000000,%200.000000)%22%20fill=%22%2358585B%22%3E%3Cpath%20d=%22M120.107118,2.98655976%20C129.877807,3.48102239%20137.6118,11.5902744%20137.6118,21.4107333%20C137.6118,31.5833317%20129.336273,39.8590667%20119.163467,39.8590667%20C108.991223,39.8590667%20100.7158,31.5832277%20100.7158,21.4107333%20C100.7158,13.9730581%20105.18351,7.3461597%20111.896469,4.45916028%20L112.23973,4.31560109%20L112.4118,4.4314%20L112.4118,5.84406667%20L112.337345,5.95839175%20C106.263852,8.64357185%20102.263133,14.666628%20102.263133,21.4227333%20C102.263133,30.7564931%20109.829964,38.3237333%20119.163467,38.3237333%20C128.497533,38.3237333%20136.064467,30.7565954%20136.064467,21.4227333%20C136.064467,12.5448391%20129.200415,5.21329821%20120.42009,4.56836882%20L120.235532,4.55646667%20L120.236333,21.1063333%20L120.111333,21.2313333%20L118.706,21.2313333%20L118.581,21.1063333%20L118.581,3.119%20L118.706,2.994%20L120.099532,2.99346667%20L120.107118,2.98655976%20Z%20M41.7660286,1.29646667%20L41.6756661,2.18434247%20L41.6216667,27.0698%20C41.6216667,32.8202299%2046.8910832,37.5111333%2053.3816667,37.5111333%20C59.8718154,37.5111333%2065.1416667,32.8200227%2065.1416667,27.0698%20L65.1416667,1.29646667%20L67.0446953,1.29646667%20L66.9543327,2.18434917%20L66.8996667,27.0698%20C66.8996667,33.8027866%2060.8301586,39.2691333%2053.3816667,39.2691333%20C45.932613,39.2691333%2039.863,33.8028817%2039.863,27.0698%20L39.863,1.29646667%20L41.7660286,1.29646667%20Z%20M179.387762,1.29765459%20C179.780465,1.38210694%20180.083867,1.6968455%20180.083866,2.12035652%20L180.138533,39.2687333%20L178.380533,39.2687333%20L178.328,6.169%20L163.570716,38.7418423%20C163.440251,39.0439717%20163.129821,39.2280667%20162.773867,39.2280667%20C162.417119,39.2280667%20162.106757,39.0432205%20161.978955,38.7442126%20L147.1672,6.16920245%20L147.1672,39.2687333%20L145.4092,39.2687333%20L145.4092,2.12073333%20C145.4092,1.69665248%20145.712302,1.38194475%20146.10584,1.29754018%20C146.501585,1.21333903%20146.910647,1.37793508%20147.082779,1.76525387%20L162.773473,36.2732164%20L178.409309,1.76676826%20C178.581718,1.37776518%20178.990821,1.21342222%20179.387762,1.29765459%20Z%20M87.9933333,8.24966667%20L87.9933333,39.269%20L86.2353333,39.269%20L86.2353333,8.24966667%20L87.9933333,8.24966667%20Z%20M236.616,8.24966667%20L236.616,39.269%20L234.858,39.269%20L234.858,8.24966667%20L236.616,8.24966667%20Z%20M283.4476,1.2418%20L283.4476,2.9998%20L258.168927,2.9998%20L258.168502,19.6117862%20L258.1736,19.7058646%20L258.168998,37.5111333%20L283.4476,37.5111333%20L283.4476,39.2691333%20L257.2896,39.2691333%20C256.775391,39.2691333%20256.410933,38.9044%20256.410933,38.3898%20L256.410933,2.12046667%20C256.410933,1.60639548%20256.775529,1.2418%20257.2896,1.2418%20L283.4476,1.2418%20Z%20M204.585867,0.583466667%20C204.94609,0.583466667%20205.258723,0.769002848%20205.390079,1.07423047%20L221.552951,37.8582373%20L222.08515,39.0988%20L220.120912,39.0988%20L219.943019,38.5607753%20L204.585864,3.64047345%20L189.236453,38.5422773%20L189.051587,39.0988%20L187.088065,39.0988%20L187.62032,37.8568982%20L203.781929,1.07534048%20C203.91259,0.769164909%20204.22612,0.583466667%20204.585867,0.583466667%20Z%20M18.372,0.583466667%20C18.7324742,0.583466667%2019.0452701,0.769254885%2019.175546,1.07423047%20L35.3384174,37.8582373%20L35.8706169,39.0988%20L33.9070458,39.0988%20L33.7291525,38.5607753%20L18.3719971,3.64047345%20L3.02258612,38.5422773%20L2.83772045,39.0988%20L0.873531913,39.0988%20L1.40578833,37.8568948%20L17.5680625,1.07534048%20C17.6987888,0.769011806%2018.0117976,0.583466667%2018.372,0.583466667%20Z%20M295.026733,31.6882%20L297.352067,37.3095333%20L299.410733,31.6882%20L300.3974,31.6882%20L301.048733,39.0188667%20L300.0754,39.0188667%20L299.632733,33.9542%20L297.782733,39.0188667%20L296.9694,39.0188667%20L294.866733,33.9335333%20L294.4874,39.0188667%20L293.508067,39.0188667%20L294.074733,31.6882%20L295.026733,31.6882%20Z%20M292.688733,31.6882%20L292.688733,32.6748667%20L290.472067,32.6748667%20L290.472067,39.0188667%20L289.4854,39.0188667%20L289.4854,32.6748667%20L287.248067,32.6748667%20L287.248067,31.6882%20L292.688733,31.6882%20Z%20M276.688,19.3763333%20L276.688,21.1343333%20L263.181333,21.1343333%20L263.181333,19.3763333%20L276.688,19.3763333%20Z%20M101.676733,1.2416%20L101.676733,3.00026667%20L87.776047,2.99803712%20L87.6967137,3.00870379%20L87.6634,3.01093333%20L86.2347333,3.01093333%20L86.2347333,3.00026667%20L72.4414,3.00026667%20L72.4414,1.2416%20L101.676733,1.2416%20Z%20M250.299133,1.2416%20L250.299133,3.00026667%20L236.399114,2.99803712%20L236.31978,3.00870379%20L236.286467,3.01093333%20L234.8578,3.01093333%20L234.8578,3.00026667%20L221.064467,3.00026667%20L221.064467,1.2416%20L250.299133,1.2416%20Z%22%20id=%22Combined-Shape%22%3E%3C/path%3E%3C/g%3E%3C/g%3E%3C/svg%3E%20)

Hub Pairing Assistant
Not all Networks are compatible with the Pulse 2 Hub.
INCOMPATIBLE NETWORKS – 5GHZ
The Pulse 2 Hub CANNOT connect to a 5 GHz Network
INCOMPATIBLE NETWORKS – WIRELESS
2.4 GHz Networks only!
![]() The Pulse 2 Hub must be connected to a 2.4 GHz network.
The Pulse 2 Hub must be connected to a 2.4 GHz network.
There are 5 common WiFi setups noted below:
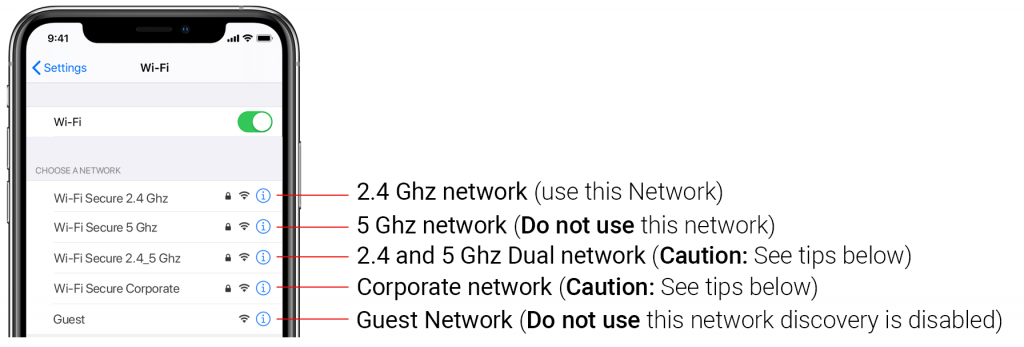
5 GHz NETWORKS
The Automate Pulse2 Hub is not compatible with these networks. Turn OFF Autojoin to the 5 GHz network and ‘Forget’ that network. Connect to the 2.4 GHz network. (Only during the hub pairing process).
DUAL-BAND NETWORKS
A dual–band network means the 2.4 GHz network and 5GHz are combined into one. The phone will automatically switch between the 2.4 GHz and 5 GHz band. If the phone is connected to the 5 GHz band the hub pairing process will fail.
- Resolution:
Option 1
You can temporarily disable the 5ghz band in the Modem or Router settings while pairing the hub. Your Internet Service provider can guide you through this process. - Option 2
If you move far enough away from your modem the phone should connect to the 2.4 GHz band, allowing the pairing process to go through. This may not always work, so ensure you know the location of the router and move as far away as possible. If pairing failure persists, proceed with Option 1.
- Option 3
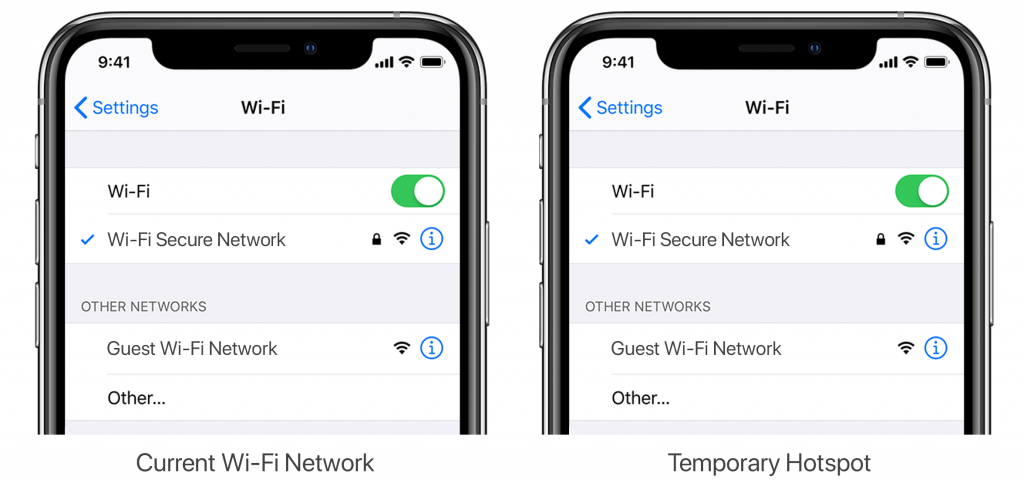
Disable or your modem or router, create a hotspot with another device, name the hotspot and password identical to your dual-band network. Pair the hub to the hotspot. Now turn your modem back on and turn the hotspot off. This will allow you to connect to the Dual WiFi Network.
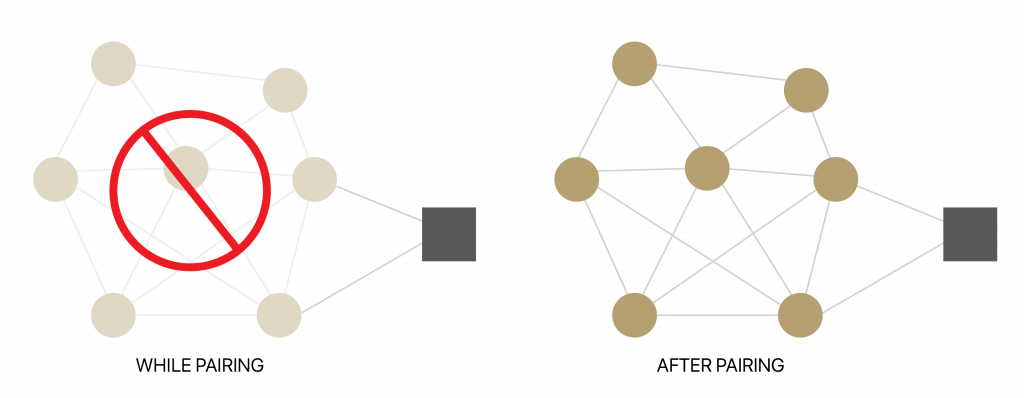
MULTIPLE ACCESS POINTS
In larger homes or corporate environments, pairing the hub while multiple access points are active can be troublesome.
- Resolution:
Option 1
Disable the access points and pair to the modem only, re-enable the access points after pairing. - Option 2
Disable or your modem or router, create a hotspot with another device, name the hotspot and password identical to your network. Pair the hub to the hotspot. Now turn your modem back on and turn the hotspot off. This will allow you to connect to your WiFi Network.
NETWORK SECURITY SETTINGS COULD BE INTERFERING WITH THE SETUP PROCESS.
Ensure you are NOT on the Guest network. Guest networks have discovery mode switch off and is troublesome
GUEST NETWORK.
Some companies or homes have network security settings more advanced than the typical homeowner. If you are setting up in this environment, please consult your network administrator. Ensure you remove firewall during the pairing process or create a DHCP reservation. This is a permanent IP address assignment that is reserved. Using the Mac ID listed in under the Hub info, create a DHCP reservation to ensure that every time your hubs connects to your router, it will be given the same address.
SMART MESH NETWORKS
Mesh networks are becoming more common, which means you have a central router with Wireless Access Points (WAPs) around the home. Normally there are no issues, however on occasion it is required to deactivate all WAPs but the main router during the Pulse 2 pairing process.
For Mesh networks, you can often control the 2.4 GHz/5 GHz capabilities in the router app for your system and potentially disable access points if necessary. Ensure you find the manufactures instructions on how to do this, which will allow you to pair the hub. Then go ahead and return settings as normal
Common Mesh Systems:
- Google Nest WIFI
- Asus ZenWiFi AX (XT8)
- Netgear Orbi
- Netgear Orbi WiFi 6
- Netgear Nighthawk MK63
- Netgear Orbi AC1200
- TP-Link Deco M5
- Ubiquiti Amplifi HD
- Linksys Velop
Support Resouces:
For further assistance, contact your retailer, or visit our website at automateshades.com
Shade Issues
understanding wireless signal strength
This article will help you understand your signal strength and offer solutions on how to improve it.
If you have seen a pop-up message in the app, you may find yourself on this page, thinking about how you can go about resolving this. One common cause may be that the shade is simply out of range, in relation to the hub.
To explain signal strength in simple terms, talking to a friend at 50db in a library will mean your friend will have no problem hearing you even if he/she is serval feet away. However, talking to your friend at the same noise level in a sports arena may mean they won’t hear you at all, and the sound won’t travel that far. In order for your friend to hear you, you need to take away the noise (interference), stand closer or talk louder. This methodology can be applied to wireless devices; take the hub closer to the shade and remove the interference or boost the signal.
Within our advanced motors, we can record the Received Signal Strength. When the shade communicates with the hub it updates the last known Signal Strength (the raw value will be displayed in the settings menu for that device e.g. -76). If the Signal Strength value is between -50 to -81 the signal strength is excellent or good.
-60dB means it is in a good environment that has little interference while -95db means the signal needs is weak due to distance or interference.
We have made it easy for you to understand by ensuring the signal strength of the shade is shown in the device screen represented by one of these four categories; Excellent, Good, Average or Poor.
This indicator will also change color based on the table below. These values will fluctuate slightly as the hub or motor’s environment degrades or gets better. If the signal strength is Average and -90 you may find it can worsen depending on the environment.

In some cases, shades with Poor signal strength may seem to operate just fine, but it may not always report an accurate position due to a poor signal.
Shades higher than -97 are known to be inoperable and should be addressed.
So now that you understand what this means, what contributes to low signal strength you ask?
Interference or low signal can be attributed to the following;
- Physical obstructions in the home like concrete floors and walls
- Metal infrastructure in home that absorbs the signal
- Competing systems on the same radio frequency
- Mirrors and (Windows Made from Low-E glass)
- Baby monitors, Alarms, and doorbells
- Other home appliances and devices.
So, how do you make the hub or shades perform better?
You have two options; you can move the hub closer but remember that can impact other shades, so before we do that let’s adjust / check the antenna on the shade itself.
ADJUSTING THE MOTOR ANTENNA
The Automate Pulse2 Hub is not compatible with these networks. Turn OFF Autojoin to the 5 GHz network and ‘Forget’ that network. Connect to the 2.4 GHz network. (Only during the hub pairing process).
Our motors can send and receive signals, it may be the hub sends the signal without any issues but it may be when the motor sends the hub a signal, it gets lost.
Adjusting the antenna on the motor will certainly help, and we found even a minor adjustment can improve or degrade the strength by 25%.
Some motors allow you to wrap the antenna around the head of the motor, in which you can still keep it wrapped but you may need to slightly expose the antenna. See some illustrations and tips on how this can be done.
NOTE: In some instances the antenna may get caught up in the fabric, so ensure it is free when moving the shade up and down.
QUESTION: I’ve adjusted the antenna and it’s improved, but it’s still not satisfactory;
MOVE THE HUB
The simple thing to do is invest in a second or even a third hub, allowing the system to operate as one.
But before you invest in a second hub, let’s try some of the options listed below.
In some cases, moving the hub improves some shades but degrades others. After you adjusted or tried any of these options, be sure you check the signal strength of all the shades, as it may have improved one but degrade another. Tip: Connect the hub into a power bank that allows you to place the hub anywhere while testing.
| Tips | Potential Result |
| Always deploy the hub in a horizontal position. The hub antenna was designed to have a better performance to spread the signal when the hub is placed horizontally. |
could add +/- 5-15% strength |
| Ensure the hub is in the open environment and not covered | could add +/- 5-15% strength |
| Simply rotating the hub 90 degrees while still flat on the surface could have a small impact and make the difference required. |
could add +/- 2-5% strength |
| Move the hub a foot or two higher and check again. If the hub is too high, maybe move it lower. We recommend placing the hub no lower than 20 inches or 50cm from the floor. You may want to try a few options here and test the performance. |
could add +/- 10-20% strength |
| If the hub is wedged in a corner and touching the wall, try moving it away 1 inch | could add +/- 2-5% strength |
| Then more drastic things you can do is move the hub closer to the affected shade. Often problematic shades (a lot of interference) need to be a lot closer than others.Move the hub and check the affected shade to see if the performance has improved. |
could add +/- 10-20% strength |
| Check the path of the signal from the hub to check the motor. If there are any items made of metal e.g. TV or microwaves or even an aquarium), try to move the hub to avoid these paths |
could add +/- 2-5% strength |
| You could have other radio frequency interference, and you have 20-30 shades connected to one hub which may mean you may need an additional hub, to allow a stronger signal strength per hub and ultimately spread the load. |
could add +/- 10-20% strength |
REPEATERS
Repeaters are great if you have 1 or 2 problematic shades, they will assist to boost the signal. However when there are more than 2 problematic shades, and you tried all of the above with no success, need to install a second hub.
In some rare cases, it’s found repeaters degrade the overall performance as it makes the signal path of some shades longer and creates additional unnecessary interference.
Tips
- Change the orientation of the repeater. Some environments require you to point the repeater vertically while others need horizontal orientations.
- Try putting the repeaters in other rooms
- Never use more than 2 repeaters per home.
CHARGE YOUR MOTOR
If you see the low battery icon, it may mean it is time to charge your motor. A depleted battery may also impact the signal strength, so ensure your shades are fully charged.
Hub Offline Assistance
Your hub should always be connected to the internet.
Certain router configurations can interfere with the hub’s internet connection. These include:
- Router IP limits. Some Wifi routers limit the number of devices that may be connected to it at one time. Check your router settings. You can create a permanent DHCP reservation to ensure your hub never gets kicked off your router due to limits. Review your router’s manual or contact their support for more info.
- Newly placed Firewalls or other security measures can block the hub from properly connecting to the internet. Try whitelisting your hub’s IP address within your router settings and see if the behaviour improves. Review your router’s manual or contact their support for more info.
- If your hub is connected to your Wifi router via an ethernet cable, ensure you have a solid connection. Try connecting to a different ethernet port on your Wifi router if available. If you are connecting your hub to a third-party integration (BEMO, Control4) via ethernet, ensure that third-party device is connected to your router and provides internet access via its ethernet port. Be aware that hub pairing via an ethernet connection is not currently supported.