%20-%20https://sketch.com%20--%3E%3Ctitle%3EBranding%20/%20Automate%20Logo%3C/title%3E%3Cdesc%3ECreated%20with%20Sketch.%3C/desc%3E%3Cg%20id=%22Branding-/-Automate-Logo%22%20stroke=%22none%22%20stroke-width=%221%22%20fill=%22none%22%20fill-rule=%22evenodd%22%3E%3Cg%20id=%22Logo%22%20transform=%22translate(-1.000000,%200.000000)%22%20fill=%22%2358585B%22%3E%3Cpath%20d=%22M120.107118,2.98655976%20C129.877807,3.48102239%20137.6118,11.5902744%20137.6118,21.4107333%20C137.6118,31.5833317%20129.336273,39.8590667%20119.163467,39.8590667%20C108.991223,39.8590667%20100.7158,31.5832277%20100.7158,21.4107333%20C100.7158,13.9730581%20105.18351,7.3461597%20111.896469,4.45916028%20L112.23973,4.31560109%20L112.4118,4.4314%20L112.4118,5.84406667%20L112.337345,5.95839175%20C106.263852,8.64357185%20102.263133,14.666628%20102.263133,21.4227333%20C102.263133,30.7564931%20109.829964,38.3237333%20119.163467,38.3237333%20C128.497533,38.3237333%20136.064467,30.7565954%20136.064467,21.4227333%20C136.064467,12.5448391%20129.200415,5.21329821%20120.42009,4.56836882%20L120.235532,4.55646667%20L120.236333,21.1063333%20L120.111333,21.2313333%20L118.706,21.2313333%20L118.581,21.1063333%20L118.581,3.119%20L118.706,2.994%20L120.099532,2.99346667%20L120.107118,2.98655976%20Z%20M41.7660286,1.29646667%20L41.6756661,2.18434247%20L41.6216667,27.0698%20C41.6216667,32.8202299%2046.8910832,37.5111333%2053.3816667,37.5111333%20C59.8718154,37.5111333%2065.1416667,32.8200227%2065.1416667,27.0698%20L65.1416667,1.29646667%20L67.0446953,1.29646667%20L66.9543327,2.18434917%20L66.8996667,27.0698%20C66.8996667,33.8027866%2060.8301586,39.2691333%2053.3816667,39.2691333%20C45.932613,39.2691333%2039.863,33.8028817%2039.863,27.0698%20L39.863,1.29646667%20L41.7660286,1.29646667%20Z%20M179.387762,1.29765459%20C179.780465,1.38210694%20180.083867,1.6968455%20180.083866,2.12035652%20L180.138533,39.2687333%20L178.380533,39.2687333%20L178.328,6.169%20L163.570716,38.7418423%20C163.440251,39.0439717%20163.129821,39.2280667%20162.773867,39.2280667%20C162.417119,39.2280667%20162.106757,39.0432205%20161.978955,38.7442126%20L147.1672,6.16920245%20L147.1672,39.2687333%20L145.4092,39.2687333%20L145.4092,2.12073333%20C145.4092,1.69665248%20145.712302,1.38194475%20146.10584,1.29754018%20C146.501585,1.21333903%20146.910647,1.37793508%20147.082779,1.76525387%20L162.773473,36.2732164%20L178.409309,1.76676826%20C178.581718,1.37776518%20178.990821,1.21342222%20179.387762,1.29765459%20Z%20M87.9933333,8.24966667%20L87.9933333,39.269%20L86.2353333,39.269%20L86.2353333,8.24966667%20L87.9933333,8.24966667%20Z%20M236.616,8.24966667%20L236.616,39.269%20L234.858,39.269%20L234.858,8.24966667%20L236.616,8.24966667%20Z%20M283.4476,1.2418%20L283.4476,2.9998%20L258.168927,2.9998%20L258.168502,19.6117862%20L258.1736,19.7058646%20L258.168998,37.5111333%20L283.4476,37.5111333%20L283.4476,39.2691333%20L257.2896,39.2691333%20C256.775391,39.2691333%20256.410933,38.9044%20256.410933,38.3898%20L256.410933,2.12046667%20C256.410933,1.60639548%20256.775529,1.2418%20257.2896,1.2418%20L283.4476,1.2418%20Z%20M204.585867,0.583466667%20C204.94609,0.583466667%20205.258723,0.769002848%20205.390079,1.07423047%20L221.552951,37.8582373%20L222.08515,39.0988%20L220.120912,39.0988%20L219.943019,38.5607753%20L204.585864,3.64047345%20L189.236453,38.5422773%20L189.051587,39.0988%20L187.088065,39.0988%20L187.62032,37.8568982%20L203.781929,1.07534048%20C203.91259,0.769164909%20204.22612,0.583466667%20204.585867,0.583466667%20Z%20M18.372,0.583466667%20C18.7324742,0.583466667%2019.0452701,0.769254885%2019.175546,1.07423047%20L35.3384174,37.8582373%20L35.8706169,39.0988%20L33.9070458,39.0988%20L33.7291525,38.5607753%20L18.3719971,3.64047345%20L3.02258612,38.5422773%20L2.83772045,39.0988%20L0.873531913,39.0988%20L1.40578833,37.8568948%20L17.5680625,1.07534048%20C17.6987888,0.769011806%2018.0117976,0.583466667%2018.372,0.583466667%20Z%20M295.026733,31.6882%20L297.352067,37.3095333%20L299.410733,31.6882%20L300.3974,31.6882%20L301.048733,39.0188667%20L300.0754,39.0188667%20L299.632733,33.9542%20L297.782733,39.0188667%20L296.9694,39.0188667%20L294.866733,33.9335333%20L294.4874,39.0188667%20L293.508067,39.0188667%20L294.074733,31.6882%20L295.026733,31.6882%20Z%20M292.688733,31.6882%20L292.688733,32.6748667%20L290.472067,32.6748667%20L290.472067,39.0188667%20L289.4854,39.0188667%20L289.4854,32.6748667%20L287.248067,32.6748667%20L287.248067,31.6882%20L292.688733,31.6882%20Z%20M276.688,19.3763333%20L276.688,21.1343333%20L263.181333,21.1343333%20L263.181333,19.3763333%20L276.688,19.3763333%20Z%20M101.676733,1.2416%20L101.676733,3.00026667%20L87.776047,2.99803712%20L87.6967137,3.00870379%20L87.6634,3.01093333%20L86.2347333,3.01093333%20L86.2347333,3.00026667%20L72.4414,3.00026667%20L72.4414,1.2416%20L101.676733,1.2416%20Z%20M250.299133,1.2416%20L250.299133,3.00026667%20L236.399114,2.99803712%20L236.31978,3.00870379%20L236.286467,3.01093333%20L234.8578,3.01093333%20L234.8578,3.00026667%20L221.064467,3.00026667%20L221.064467,1.2416%20L250.299133,1.2416%20Z%22%20id=%22Combined-Shape%22%3E%3C/path%3E%3C/g%3E%3C/g%3E%3C/svg%3E%20)
Pulse 2 App Updates overview
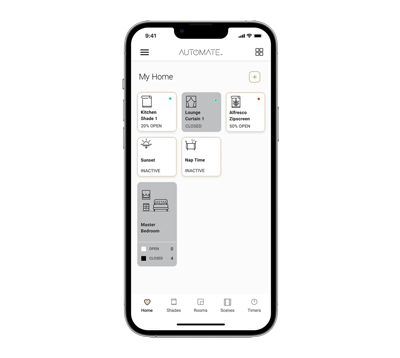
Build your home page
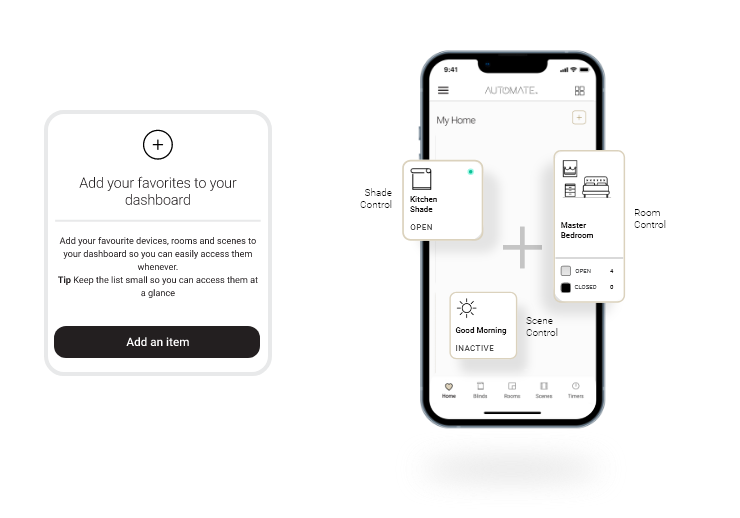
The new Pulse 2 App Home Screen will provide quick access to your favourite Rooms, Shades and Scenes. Existing Rooms, Shades and Scenes will import seamlessly with the automatic App upgrade. Simply follow the onscreen instructions to complete your setup.
How to interact with rooms, scenes and shades
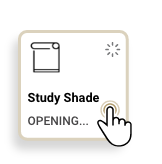
One single tap activates any Room, Scene or Shade tile from your dashboard or anywhere in the App.
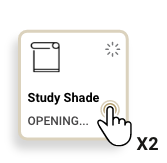
A double tap stops the Shade.
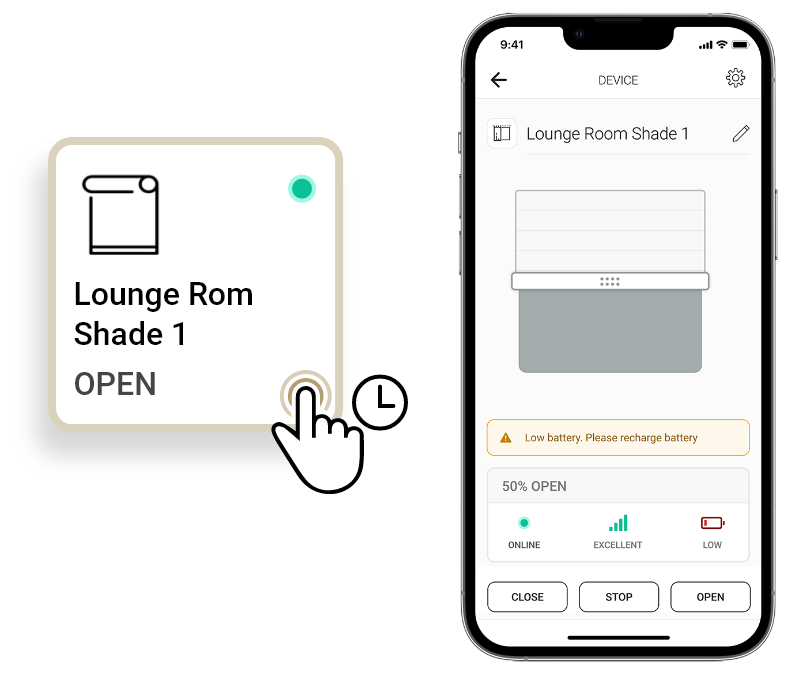
A long press will open the individual Shade for more customized control.
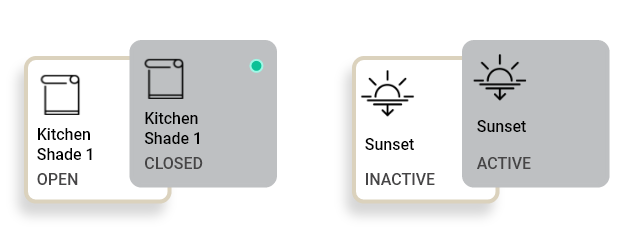
Tiles shaded grey indicates a closed Room, Shade or active Scene. One single tap will open Rooms, Shades or deactivate Scenes.
On the contrary, tiles shaded white indicate an open Room, Shade or inactive Scene. One single tap will close Rooms, Shades or activate Scenes.
Predictive Shade Positioning
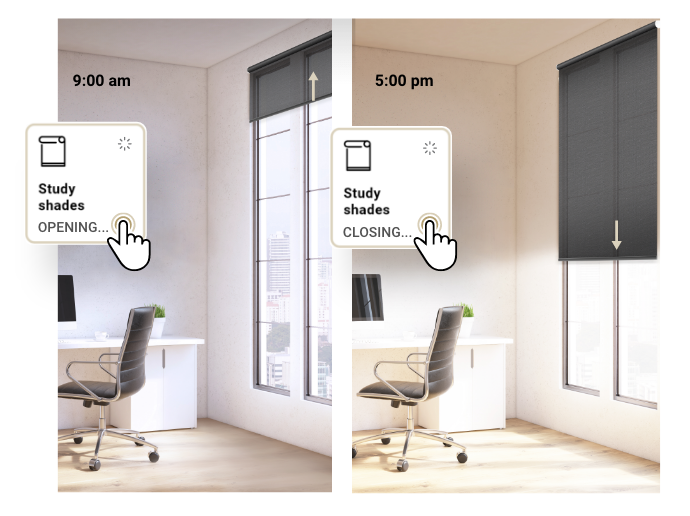
If your Shade is partially open, a single tap will automatically detect optimal positioning and open or close it accordingly – giving you more natural light during the day and privacy in the afternoon/evening.
Health Status
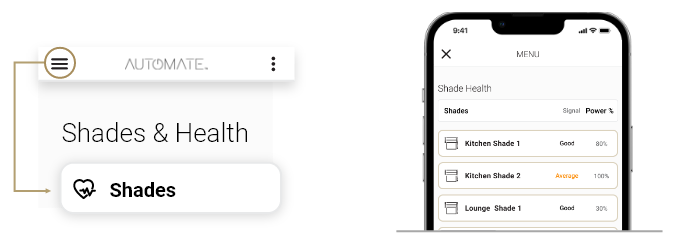
Select the Hamburger Menu at the top left of the screen, then under Shades & Health, select Shades.
This will open a screen displaying all your Shades’ signal strength and battery percentage. If you notice an offline or poor signal status, you can further investigate the issue by selecting that particular Shade.
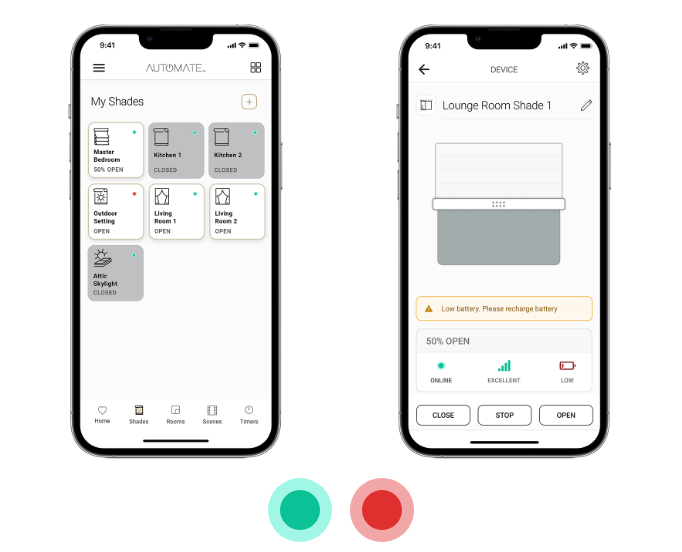
Shades on your Home Screen feature a green or red indicator in the top right-hand corner. A green light indicates your Shade Health is normal, while a red light indicates either a device is offline, has poor signal strength, or the shade has a low battery. If you notice a red light, a single long press will take you to the individual Shade screen for a more in-depth review to assist with troubleshooting.
Create shades, rooms, scenes & timers
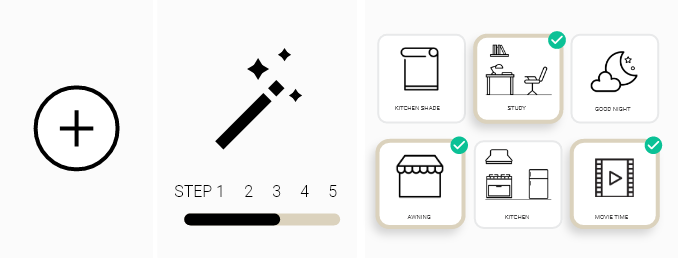
Follow the intuitive on-screen instructions to quickly add new Rooms, Shades, or Scenes providing superior customised automation. Apply Timers to Scenes you want to activate automatically so you can set and forget.
Quick access INTEGRATIONS
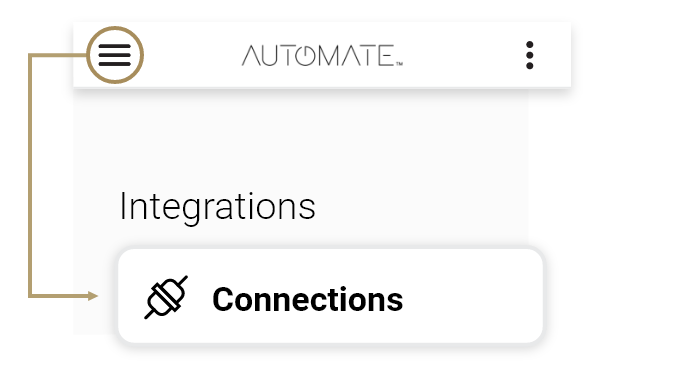
Press the hamburger Menu at the top left of the screen, then select Connections.
Use the Connections page to quickly and easily integrate your Shades with popular voice control assistants.
EXPLORE INTEGRATED HELP
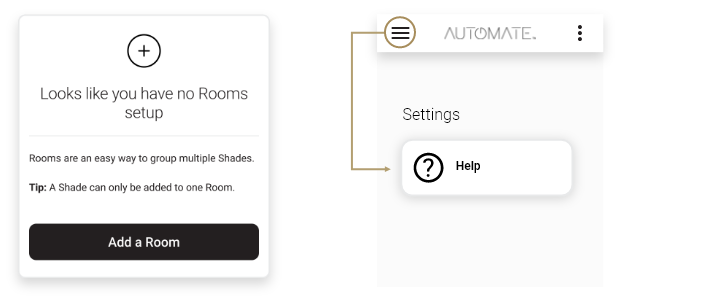
If no Shades, Rooms, Scenes or Timers are set up in your App, then helpful tips will be included on every start-up screen. There will also be a dedicated Help Page you can access from the Hamburger Menu for more information.
Build your Home Screen
The Home Screen provides quick access to your favourite Rooms, Shades and Scenes.
Before creating your Home, ensure you have existing Rooms, Shades and Scenes in the app. Then simply follow the onscreen instructions to complete your setup. The Home screen can be filled with all your shades’ rooms and scenes, we recommend keeping the list small, so it’s easy to access only your favourite shades.
Shade Setup
Pairing your Automate Shade
- If you get the Shade fail screen move the Hub Closer during the pairing process
- To ensure successful pairing, make sure the shade is put in pairing mode when you are prompted to pair in the app.
- Pairing with Remote: Make sure you note two independent Jogs before pressing Pair in the app
- Pairing with Shade: Make sure you press the p1 Button on the motor and the shade Jogs once.
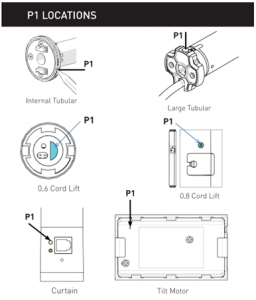
Can’t locate the P1 Button?
- Below is a diagram showing where the P1 button could be located depending on the motor type
Rooms
Creating your Rooms
If you want to activate a whole room with one button press, simply add devices to one room. Note once a shade is added to a room it can’t be added to another room.
Scenes
Creating your Scenes
With scenes, you can control multiple shades at the same time. For example, Create a scene called “Good Morning” that opens all the shades in your home except rooms you want privacy. Or set a “Good Night” scene that closes all the shades in the home.
Other scenes can be set in shades to remove glare from the TV but still has some light that comes in.
You can create a scene manually or capture all the shade’s current positions and then save that scene.
You can create up to 25 scenes
Simply follow the onscreen prompt to start creating your first scene.
Timer Setup
Programming your Timers
A timer is created to activate a Scene or a single Shade at a certain time.
Types of timers
Time-Based- Time-based timers will activate a Scene or a single Shade at a set time for example 7:00 am and can be programmed to activate certain days in the week and will be recurring until disabled.
Smart Sunset/Sunrise – will activate a Scene or a single Shade at sunset or sunrise, This is not a set time but is based on when the sun sets or rises in your area.
Offset: You can also set an offset plus or minus with your Sunset or sunrise timer. For example, if the sun sets but it’s not quite dark yet you can add an offset that the Sunset timer activates at sunset + 25 min or – 25 Minutes. This will allow the timer to activate exactly when it’s light or dark.
Even if your hub is disconnected from the internet the Pulse 2 Hub will still continue activating the timers.
Hub Pairing
Pairing your Pulse 2 Hub
Connecting the Hub to the Wi-Fi is the first step, thereafter you can start adding shades rooms and create scenes and timers.
Please note: Not all Networks are compatible with the Pulse 2 Hub.
Do not try pair the hub via the Ethernet Cable. Ethernet can be used to operate it day to day but not pairing.
INCOMPATIBLE NETWORKS – WIRELESS
- 4 GHz Networks only!
- The Pulse 2 Hub must be connected to a 2.4 GHZ network.
- The Pulse 2 Hub CANNOTconnect to a 5 GHz Network
For iOS ensure the Location Name in Pulse 2 is the same as in the HomeKit app.